I seem some large boats in that video. Most of the
Post# of 1903
I seem some large boats in that video. Most of them would have a proane stove, refrigerator and furnace. Comfortable temp living quarters.
Appears to me that although they had a whole week to prepare few people bothered to do so. I looked in our cabinets and see that we could last for over a week. Peanut butter, V-8, tuna, canned Vienna sausages, beans, Velveta, beets, pasta sauce, pasta, etc.
Buddy burners would have provided for cooking many items in the refrigerator/freezer.
Six or more burners under a BBQ grate would cook hamburgers, hot dogs, even a steak.
People failed to load up on cans of Steno or bags of charcoal.

One of the most innovative outdoor cooking methods, and excellent to have for power-related emergencies at home, is the simple homemade tin can stove which can be used for frying, boiling and toasting. It is best used for one or two people because of its small size. It is also disposable; just recycle after use.
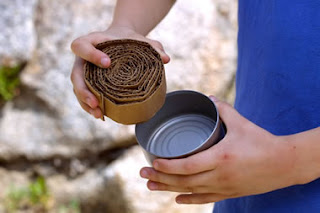
A buddy burner (a tuna can—or a can similar in shape—filled with rolled corrugated cardboard and melted paraffin) is the main source of heat for a tin can stove.
To make the tin can stove:
First, cut out one end of the #10-size can (102-ounce or 6-pound 6-ounce) available from restaurants. With tin snips cut two slits 3 inches high and 31?2 inches apart on one side of the can at the open end, leaving the top attached. Pull the door open.
With a punch-type can opener, punch two or three holes on the backside of the can near the top. These act as a chimney, allowing the smoke to escape during cooking.

A skillet may be used on top of the tin can by removing the top so it is open. When using pans, be sure to rub liquid soap on the bottom of the pan so they will clean easily.
Cut top from #10-size can to cook directly on top
To make the buddy burner:
Cut corrugated cardboard (across the corrugation so holes show) into strips the same width as the height of the tuna can. Roll strips tightly to fit inside the can.

Heat the wax in a double boiler and pour melted wax into the cardboard. Or set a piece of wax on the cardboard and light a match next to the wax (see picture). Continue adding wax near the flame until the buddy burner is filled. The cardboard serves as a wick, and the wax serves as the fuel, providing the heat for the stove.

When lighting, it may help to lay the can on its side so that the flame spreads across the cardboard. It will burn 1 ½ to 2 hours. To refuel, add a new small piece of wax when it is burning and let it melt into the burner. When finished, let the wax harden before storing.
To make the damper:
A damper covers the buddy burner to control the amount of heat. It is easy to make out of foil or from the lid of a tuna can. To make: fold an 18-inch by 15-inch piece of heavy-duty foil into 3-inch sections again and again until all the foil is used.

Bend the foil down as a handle to set over the tuna can. To make a handle with a cardboard pant hanger (minus the cardboard), bend ends together. Punch holes in the top of the tuna can lid on each side. Wire the lid to the ends of the hanger.

Bend the handle of the coat hanger down so that it will prop itself up while the buddy burner is burning. Move the damper to increase or decrease the heat. Use a tuna can, wax and cardboard to make the buddy burner.

Bacon frying, just add the egg.
This is so easy even kids can do it.

There are numerous "camping" and survival stoves.

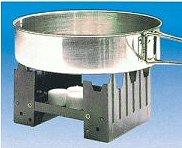
Portable emergency stove - Light, Strong, Compact, no liquid, no priming, no wicks, no pressure. Perfect for Emergency/Bug out Bags! (pan not included)
- Folds up into a compact unit for easy storage.
- Folds down to 4 5/8" x 3 3/4" x 1"
- Fuel tablets burn without odor and ignite easily.
- Opens to two cooking positions.
- Made of durable plated steel.
- 24 fuel tablets included.
 (0)
(0) (0)
(0)